fbpx

Support
Services

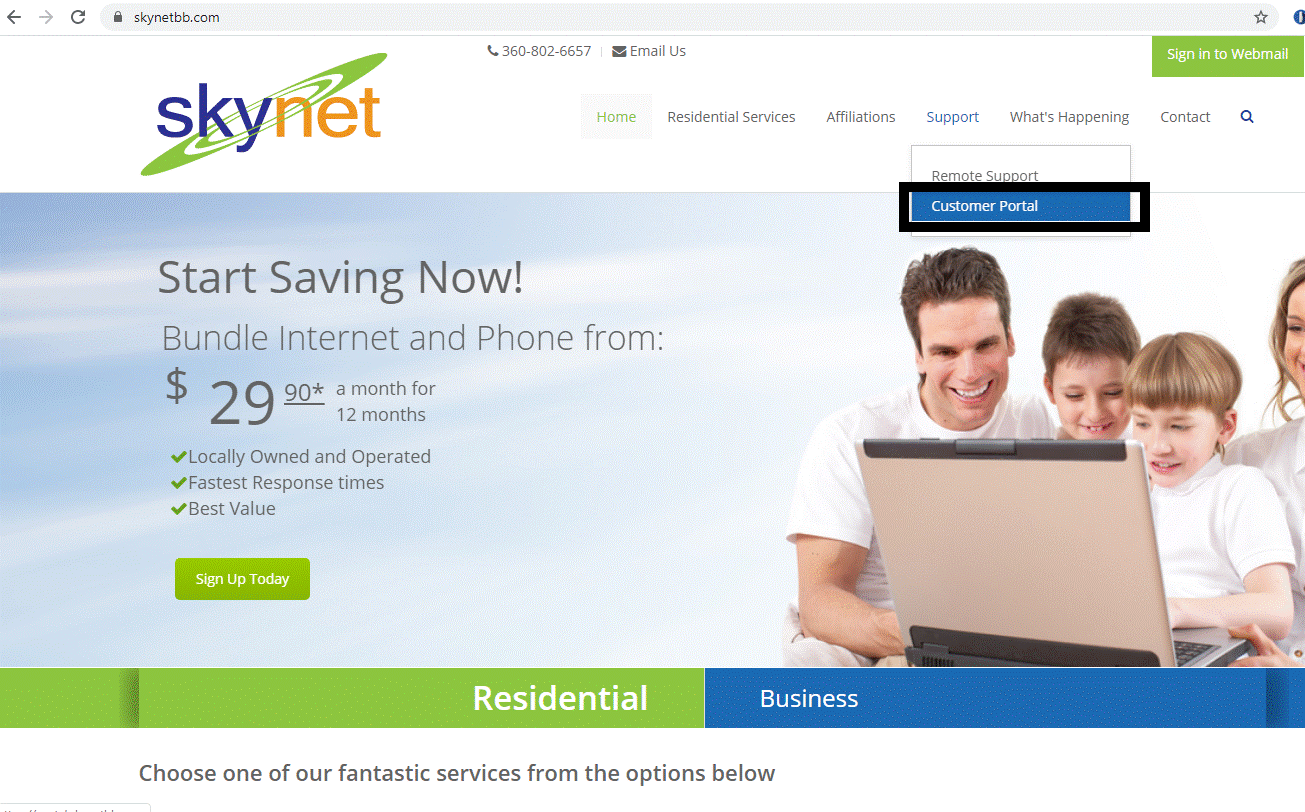
  • Go to www.skynetbb.com.

    Hover over the “support” link and choose customer portal or click here.

    Portal 1


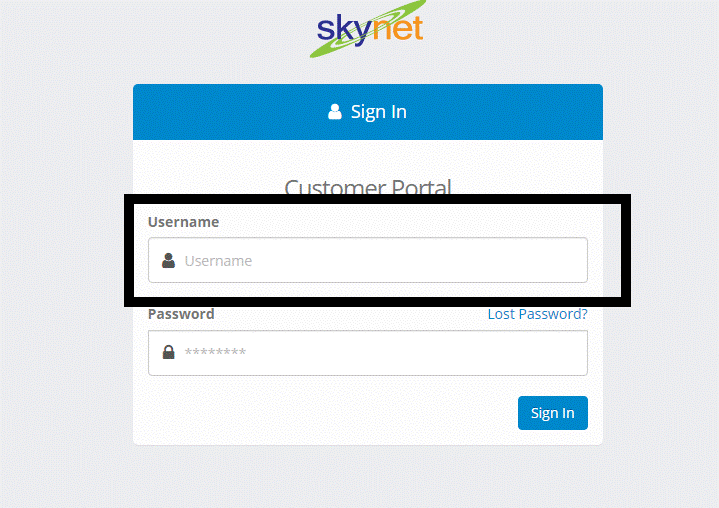
    In the username field enter the email address that is used to receive your monthly statement
    Portal 2

    If you do not know your password click the Lost Password link and enter your username. The system will send a password recovery email. If you are unsure what your username is, you will need to give our office a call at 360 802 6657
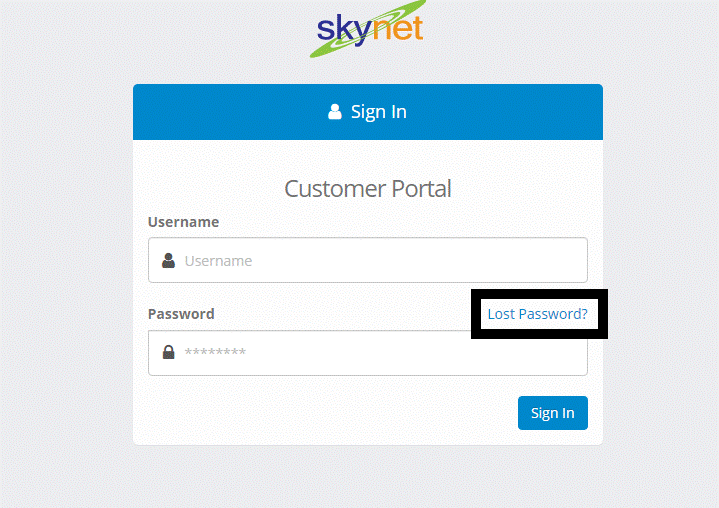
    Portal 3

    If you know your password enter it in the password field.
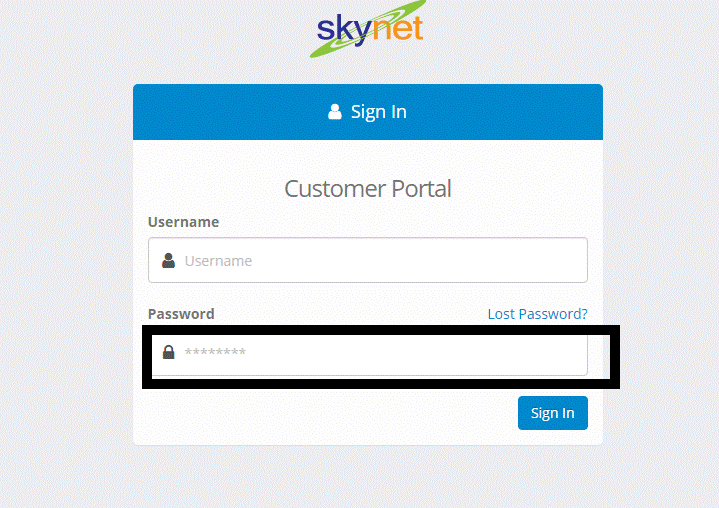
    Portal 4

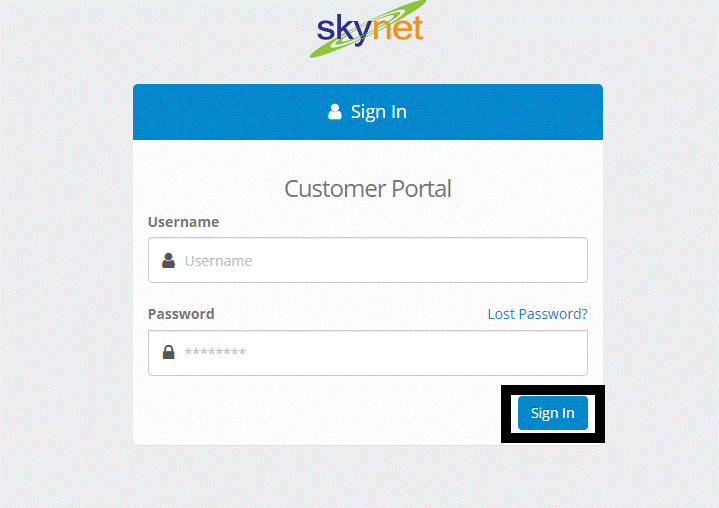
    Click the Sign In button

    Portal 5

    Go to the billing tab at the top of the page
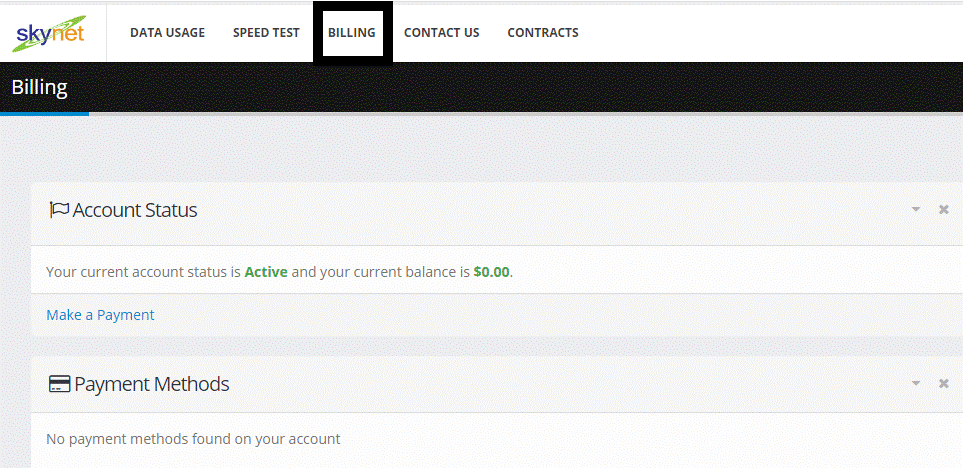
    Portal 6

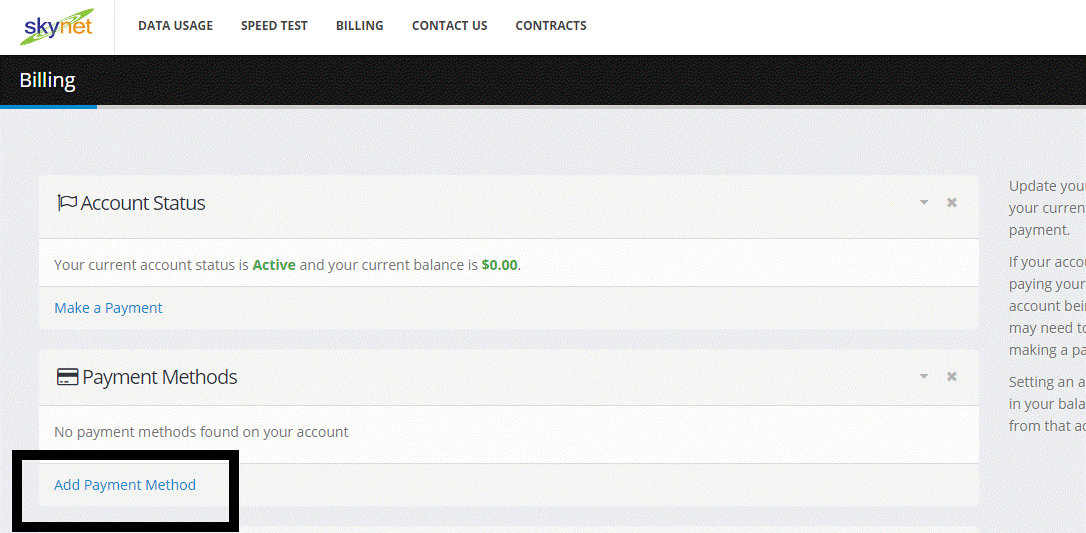
    Click the Add Payment Method link

    Portal 7

    Enter your card information then click add
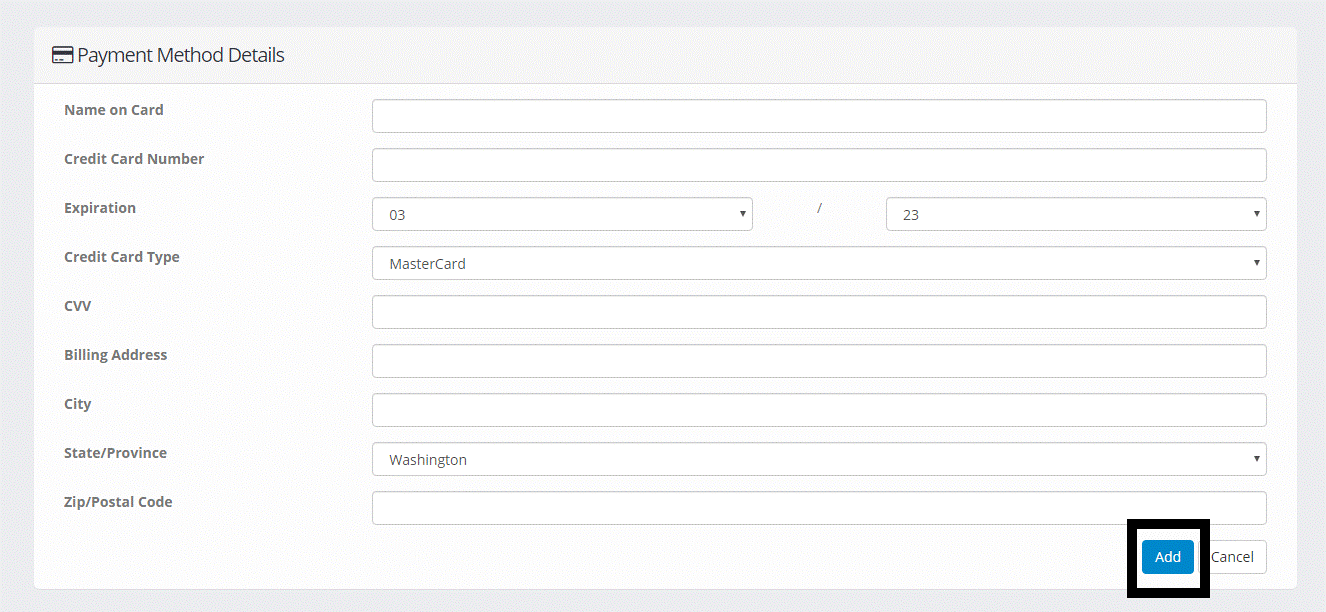
    Portal 8

    Once added, this card will be charged on the DUE DATE of your invoice automatically. You may also make a manual payment before the due date by choosing “make a payment” under the billing tab of the portal.

  • Troubleshooting Tips

    Motorola Canopy Wireless Troubleshooting Tips

    To help assist you with support, the following is a list of common issues that are easily resolved by
    following these simple troubleshooting tips:
     
    I have no connection to the Internet 
    Loss of connection may happen for several reasons,  but usually means that some device on your home network has lost connectivity. 
     
    Check the following: 
    1.  Make sure the power adapter (also called Power over Ethernet or POE) for the roof antenna is plugged firmly in the electrical outlet.
     
    2.  Make sure the physical network cables are connected to the wall plug, to the computer and to any routers.

    3. Make sure all routers are plugged in and powered.

    If this does not solve the issue do the following:
    Power cycle the roof antenna (also  called  “the  radio”) by unplugging the power adapter. Wait thirty seconds and plug the adapter back in.
    NOTE:  If the power adapter is plugged into apower strip, power cycle the power adapter itself, not the power strip.

    2. If you have a router, wireless router or other network device, then power cycle the device(s) by unplugging the power.  Wait 30 seconds and plug the device back in.
    NOTE: If the router/device is plugged into a power strip, power cycle the router/device itself not the power strip.

    3.  Make sure the Internet and network settings for your computer are correct and reboot your computer.

    Setup Windows 7 on Wireless connection

    To connect windows 7 to a wireless network Follow this link to Microsoft Help

    Setup Nook on Wireless

    Setup Kindle on Wireless

    Setup Iphone4 on Wireless Network

    Setup Ipad2 on Wifi

    How To Set Up Your Wi-Fi Connection On The IPad

    ,

    How to Set up your Wi-Fi Connection on the iPad

    Turning on Wi-Fi card on your iPad:

    1)      Tap “Settings” on the Home Screen

    2)      Tap “Wi-Fi” on the Left Hand Screen.

    3)      Slide the Wi-Fi lever to “On” on the right hand screen. This should be the first option.

    Choosing a Wi-Fi Network

    When you are connected to a wireless network, the name of that network will be displayed to the right of the “Wi-Fi” button on the left hand panel of the Settings Screen. If you have not a chosen a Wi-Fi network, follow these steps:

    1)      Follow the steps above to go into the Wi-Fi Settings. Right below where you turned on the Wi-Fi, you will find a “Choose a Network box.” Your iPad will display all the detected Wi-Fi networks. Press the name of your home network or any network you want to use. You may also manually add a Wi-Fi network by pressing the “other…” button.

    2)      Type in the network Password if you are using a secured connection.

    ipad wifi settings1 How to Set up your Wi Fi Connection on the iPad

    Instructions for Dial-Up Setup on Windows Vista

    1. Click on the Start Button and then click on the Network option.

    VPN1

    2. Select “Network and Sharing Center ” from the top of the screen.

    VPN2

    3. Next, Select “Set up a Connection or Network

    vpn3

    4. Select “Set up a dial-up connection” from the menu options.

    dialup1

    5. Set up the dialup number with the area code included, as shown. Choose your User Name and Password. There is also an option at the bottom to select if multiple people will use this connection.

    Then click connect and you are done!

    dialup2

    How to Wirelessly Connect Wii

    How to Wirelessly Connect the Wii to the Internet

    Description:

    Step by step instructions on how to connect the Wii to the Internet using a wireless connection.

    What to do:

      1. Power on your Wii console and press the A Button on the Wii Remote to reach the Wii main menu. Use the Wii Remote to select the "Wii" button.

    Wiimenu

      1. Select "Wii Settings" to access the "Wii System Settings" menu.

    Wiisettingsmenu

      1. Using the arrow on the right side of the screen, scroll to page two and select "Internet."

    Wii Settings Arrow

      1. Select "Connection Settings."

    WiisettingsInternet2

      1. Select "Connection 1: None."
        • If you do not have an empty connection slot, you will need to clear a slot. 

    WiisettingsInternet3

      1. Click on "Wireless Connection," then click "Search for an Access Point."

    Sfap2

      1. Select the wireless network that is yours.

    Asked to enter a security key?
    If you are prompted to "Enter the Password or Key," then the wireless network you are trying to connect to has wireless security turned on. You will need to type in your security key or password and select "OK."

    Secureaccess


      1. Select "OK," "Save Settings," and then "Yes."
        • The Wii console will run a connection test with your wireless network. When the test is completed, you should see the following screen:

    Sfapun2

    As long as you see "The connection test was successful," the "Wii Support Code" does not matter and can be ignored.

      • If the connection test succeeds, then your Wii is now connected to the internet.!
      • If the connection test was not successful, you will receive an error code.
        • Error Code 51330 or 52130: This means the security code you entered into the Wii is not the same one your router is set to. Look in your router's settings and try again. Please refer to step eight (8) above for more information.
        • All other error codes: Try  error code troubleshooting where we have detailed information on many common error codes. (You can ignore any "Wii Support Code" you receive on a connection test.)

    How to set-up wireless networking on your PSP

    Wireless networking might seem like a black art to rival witchcraft but in reality it's a very simple issue. You can think of it like a radio; if you're in an area that's covered by a wireless network ? maybe you've got one at home, university, school or work ? then your PSP can receive that broadcast signal and tune into it. However, while it'll try and do this by itself, it does need some input from you. For instance, many wireless networks are encrypted these days to keep them secure from computer hackers and you'll need to enter a special code (called a WEP key) into your PSP in order to connect to it. Once you are connected to a wireless network you can use the Network Update feature to connect your PSP to the internet and update its software, play multiplayer games and more!

    Step01
    Your PSP will detect any wireless wireless network within its range as long as the wireless adapter is switched on. The switch for this is on the left end of the PSP, near the analogue thumbstick. If the switch is in the down position, the wireless network adapter is off; push the switch into the up position and it'll turn it on. If you're not going to be using wireless networking it's a good idea to keep it turned off as it'll make your batteries last longer.
     Psp Wlan How To 01
    Step02
    When you turn on your PSP's wireless adapter it'll look for any wireless networks nearby. If there's another PSP within range it'll automatically set up what's called an 'ad-hoc' network between the two. This will enable you to play multiplayer games between the two PSPs with one hosting the game and the other joining it. When you want to join an existing wireless network, such as when you want to browse the internet, you'll be using an 'infrastructure' wireless networking mode.
    Psp Wlan How To 02
    Step03
    To connect to a wireless network, go to the home screen of your PSP and look under Settings. If you scroll all the way to the bottom you'll find Network Settings, so enter this and on the next screen you'll be asked to choose between Ad-Hoc and Infrastructure, so pick the latter by selecting it and pressing X. Press O to return to the previous screen. You'll need to set up a Connection. You can save the settings for 10 different Connections and you can choose between the Connections you've set up whenever you need to use the Infrastructure network mode.
    Psp Wlan How To 03
    Step04
    Pick New Connection and press X. You can give the new Connection a name by pressing X and using the text-entry screen. Give it a descriptive name like 'Home Network' or 'University Network' so you know when and where you can use it. When you've entered the name for your new Connection you'll be asked whether you want to scan for WLAN settings or to enter them manually; select the Scan option and press right on the directional-pad. Your PSP will then scan the area for any available networks and collect the settings needed.
    Psp Wlan How To 04
    Step05
    A list of available networks (called Access Points) will be displayed, giving its name (called an SSID), whether it's encrypted or not and the signal strength. If there is more than one network, use the D-pad to scroll down to the one you want to join and press X. You'll be asked to confirm the settings so press right on the D-pad to scroll through each. When you get to the security settings, choose the appropriate setting from the list, which is WEP in most cases, and press right on the D-pad again. If you need to enter the WEP key, speak to whoever runs the wireless network and they'll provide it for you. Press X and enter the WEP using the text-entry screen.
    Psp Wlan How To 05
    Step06

    Once you've done that you can check the settings you've entered on the final screen and save them. Now you'll be able to connect to the wireless network. If you return to the main home screen you can now update your PSP's software by going to Settings and selecting Network Update. Alternatively you can go to the Network section on the far right of the home screen to browse the internet using the PSP's in-built internet browser. Or you can fire up that multi-player game you've been itching to try out and get going!


    Psp Wlan How To 06

    How to connect your OS X Mac to a wireless network

    How to connect your OS X Mac to a wireless network

    Much like everything else about OS X, connecting to a wireless network is painfully easy. But if you’re not familiar w/ OS X, and need to walk someone else through it, the following steps might prove helpful.

      1. When connecting your Mac to a wireless network, one of the first things you’ll want to do is make sure that the AirPort icon is enabled in your Menu bar. If it’s already there, please skip down to Step 5.

    Screen 1a

      1. Select the Apple Button (very upper left corner of your screen) and chooseSystem Preferences… from the drop-down list. From there, select Network.

    Screen 3a

      1. Select you AirPort entry, and click the Configure… button.

    Screen 4a

      1. Make sure the Airport tab is selected from the top menu, and then place a check in the box labelled Show AirPort status in menu bar

    Screen 5a

      1. Click the AirPort icon in your menu bar, and you should be presented with a list of visible wireless networks. Select the network you want to join.

    Screen 7

      1. If the network requires a password, you’ll be prompted to enter it now. If it doesn’t, you should automatically connect.

    Screen 8

      1. When you’re connected, the AirPort icon will change from a ‘light grey’ color to a solid black. The number of solid black lines indicates the signal strength (more black bars = stronger signal). That’s it!

    Screen 1a

    How to Connect Nintendo 3DS

    How to Connect Your Nintendo 3DS to the Internet

    Let's get you connected!

    A broadband Internet connection and wireless router are required. Follow the steps below to get connected.

    Trying to connect online with an original Nintendo DS game? 

    1. Turn on your Nintendo 3DS and access the System Settings by tapping the wrench icon.

      Setup01

    2. Tap "Internet Settings."

      Setup02

    3. Tap "Connection Settings."

      Setup03

    4. Tap "New Connection."

      Setup04

    5. Tap "Manual Setup."

      Setup05

    6. Tap "Search for Access Point."

      Setup06

    7. The Nintendo 3DS will search for any wireless networks within range. Once it is finished searching, it will display the names of all the wireless networks it finds.

      Setup07

      Setup08

      Setup09

    8. Look for your wireless network. (If you're not sure which is yours, or you don't see any wireless networks, click here.)
    9. What to do next will depend on the "lock" icon you see next to your network on the Nintendo 3DS. Click the image below that matches the lock icon you see on the screen of your Nintendo 3DS.

      Setup10    Setup11

    How to configure an Actiontec DSL modem for Skynet's DSL

    PPPoA Dynamic IP

    Overview:

    Please follow the instructions that came with your modem regarding connecting the cables, and placing filters on the needed telephone outlets. Note: do not place a filter before the DSL modem. This will filter out the DSL signal.

    A basic wire topology will looks similar to the following;

    actec3

    NOTE: the Green cable should be plugged into the port labeled LINE, not phone.

    Basic Configuration:

    To configure your modem please connect the yellow Ethernet cord from your network card to the Actiontec. The Ethernet light on the modem should go solid green.

    Open Internet Explorer
    Select File then Open.
    In the Open box enter 192.168.0.1 then OK
    This should bring up the main menu or your DSL modem

    If your web browser can't open the web page http://192.168.0.1 check your computer's network configuration and make sure that it is set to "obtain an IP address automatically." Then reboot your computer and try again.

    Select Setup / Configuration --- then Begin Basic Setup

    actec4

    actec2

    Click Next until the you receive the screen below;

    On this screen please make sure you select the following settings

    Are you a MSN user? --- No

    PPPoA and PPP AutoConnect should be checked

    Locate your paperwork and supply your Username and Password. If you do not have this information please call us.

    actec1

    Select Next and then Save and Restart

    A properly configured modem will have the following lights.

    • The Power Light flashes rapidly while the Modem restarts, then it will glows steady green.
    • When the modem is operational the Internet and DSL lights will glow green.
    • Note: it does take ~30 seconds for the modem to reboot and obtain a DSL signal.

    actec5

    Connect XBox 360 To your network

    There are 3 ways to connect to Xbox LIVE and play games with people across the world using your Xbox 360:

    1. Wired Router
    2. Wireless Router
    3. Internet Connection Sharing (Windows Only)

    1. Wired Router

    This is probably the easiest way to connect your Xbox 360 to your network. You can use a 1-port router but you'll need to switch it between your computer and Xbox 360 as you use them.

    You'll need:

    • A 1-port or 4-port router
    • 1 standard Ethernet cable

    1. Connect the Ethernet cable to an Ethernet port on your router.

    Router

    2. Connect the other end of the Ethernet cable to the Ethernet port on the back of your Xbox 360.

    Xbox Ethernet connection

    3. Switch on your Xbox 360. If you've already created a gamer profile, your Xbox will connect to Xbox LIVE and open the Spotlight tab.

    If this is the first time you've used your Xbox 360 you'll need to create a gamer profile before you can connect - follow the on-screen instructions to do this.

    2. Wireless Router

    1. Connect your Wireless adaptor to your Xbox 360 and put the antenna up.

    Put the network antenna up

    2. Switch on your Xbox 360. From here the steps will differ depending on which version of the Xbox 360 system software you're using, most people will have the New Xbox Experience software installed.

    New Xbox Experience (NXE)

    1. Press up or down until you get to My Xbox. Press right to scroll through the options until you get to System Settings and press A.

    Xbox top level

    2. From the System Settings screen, choose Network Settings then Configure Network.

    System Settings screen

    3. From here, highlight the wireless information block and press A. Then select Scan for Networks.

    stuff

    4. Select the name (SSID) of your wireless network. If your router isn't broadcasting this, choose Specify Unlisted Network and enter the name.

    Wireless network lists

    5. If your network has wireless security, enter your WEP or WPA key. Press Start when you're done.

    Password

    6. You'll be taken back to the Network Settings screen. Select Test Xbox LIVE connection to make sure everything is working properly.

    Testing connection

    7. From now on your Xbox 360 will connect to Xbox LIVE automatically and open the Spotlight tab each time you switch it on.

    Original System Software

    1. Press right on your joypad until you get to the System Blade. From here choose Network Settings.

    Click Network Settings

    2. From the Network Settings menu, choose Edit Settings.

    Click Edit Settings

    3. From the Edit Settings screen, highlight and select the wireless settings block at the bottom.

    Choose SSID

    4. Select the name (SSID) of your wireless network. If your router isn't broadcasting this, choose Specify Unlisted Network and enter the name

    Choose Wireless Network

    5. Enter the appropriate security settings and password - check your router instructions if you're not sure about this. Press Start button when you're done.

    Enter WEP Key

    9. On the Apply Settings page choose Test Xbox LIVE. You'll see a screen telling you that your Xbox 360 is connected.

    Test Successful

    10. Your Xbox 360 will want to download the NXE software once it's connected. You'll not be able to sign in to Xbox LIVE until your system has updated.

    3. Internet Connection Sharing (Windows Only)

    If you're using a USB modem then you'll need to use Windows Internet Connection Sharing (ICS) to get your Xbox connected.

    With this method you'll need your computer switched on whenever you want to connect to Xbox LIVE.

    To do this you'll need:

    • A network interface card (NIC) in your computer
    • 1 crossover Ethernet cable

    1. Connect one end of your Ethernet cable to the Ethernet port on your computer.

    PC connection

    2. Then connect the other end to the Ethernet port on your Xbox 360.

    Xbox Ethernet connection

    3. Setup Windows ICS on your PC to share your Internet connection - (these instructions are for Windows XP):

    • On your computer, open the Network and Dial-up Connections folder
    • Right-click on your Internet Connection and select Properties
    • From the Properties window, click the Advanced Tab
    • Tick Allow other network users to connect through this computer's Internet connection. If your computer has more than one network adapter, you'll need to select the one to use for sharing the Internet connection.
    • Click OK. If your LAN network adapter already has an IP address assigned, Windows will warn you that it will change the IP. ClickYes to continue.

    Once you've set up ICS make sure you can still get online with your PC.

    4. Switch on your Xbox 360. If you've already created a gamer profile, your Xbox will connect to Xbox LIVE and open the Spotlight tab.

    If this is the first time you've used your Xbox 360 you'll need to create a gamer profile before you can connect - follow the on-screen instructions to do this.

    Configure WRT54G Wireless Router in PPPOE mode

    Step 1: Make sure that you can go online by connecting your computer to the modem (Without connecting WRT54G router in the network).

    Step 2: Connect your computer to the one of the LAN port of WRT54G.

    Step 3: Connect the modem to the WAN Port of WRT54G and all devices should be powered on.

    Linksys WRT54G Wireless Router Linksys Wireless G Router

    Step 4: Open Internet Explorer and type the default IP Address of the Router. The default IP address of WRT54G is 192.168.1.1 and press enter.


    Log on to Linksys WRT54G Wireless Router by typing the router IP address
    Step 5: After Entering the default user name and Password you will log on to the Router Setup page.

    Default user name : {no user name}
    Default Password : admin


    Setup Page of Linksys Wireless G Router

    Update: To configure in PPPOE there is no need to change the current Local IP Address.

    Step 6: On setup page select PPPOE instead of "Automatic Configuration DHCP"

    Configure Linksys Wireless G router in PPPOE mode

    Step 7: Enter the user name and Password provided by Skynet Broadband and click on save.


    Enter PPPOE settings on WRT54G Wireless Router


    Step 8: Click on status bar and click on connect button.


    Connecting to PPPOE server by clicking connect button

    Connect Android Phone to Wireless Network

    On your Android phone tap on Settings.

    - Under Settings tap on Wireless and networks.

    - Once in Wireless and networks just tap on 

    Wi-Fi settings.


    - Now you'll see if Wi-Fi is turned on and if you are already connected.

    - You can also toggle a feature to notify you when there is an open network.

    - Below this you'll see a list of wireless networks close to you.

    - The icon to the right of each network name shows you the strength of the signal and if it's secured.

    - It also shows the type of security like WEP, WPA2 and so on.

    - To connect to a wireless network just tap on it.

    - You'll now be prompted to put in the password unless the network is unsecured.

    - You can check the box so the password is shown to you as you enter it.

    - When you've completed the password just tap Connect and you'll be connected.


  • Preferred Dial-up numbers

                   
    Aberdeen 360-637-7028   Arlington 425-407-7029   Auburn 253-326-8030
    Bainbridge Island 206-451-6028 Bellevue 425-440-5026 Bothell 425-908-8030
    Bremerton 360-917-2030 Chehalis 360-266-4028 Des Moines 206-651-8028
    Enumclaw 360-625-7026 Everett 425-407-7028 Graham 253-655-6540
    Halls Lake 425-835-8028 Hoodsport 360-877-3028 Issaquah 425-394-7028
    Kent 253-277-6026 Kirkland 425-898-6028 Mount Vernon 360-542-9775
    Oak Harbor 360-969-8028 Olympia 360-549-2029 PortAngeles 360-797-6028
    Port Townsend 360-390-7028 Poulsbo 360-434-9029 Quilicene 360-390-7029
    Renton 425-390-6029 Seattle 206-402-0029 Shelton 360-549-2028
    Silverdale 360-434-9028 Snohomish 360-512-6028 Sumner 253-987-3028
    Tacoma 253-363-4028 Tacoma/Waverly 253-778-4028 Whatcom County 360-398-4028
    Whatcom County 360-398-4029            


  • The links below are guides on how to setup your email client.

    Our emails server require SMTP authentication. Please ensure that you turn this on in your email client. Also, please ensure that when you are entering your username in either Webmail or your email client, use your full email address etc: This email address is being protected from spambots. You need JavaScript enabled to view it.

    Below are some of the common settings needed by our customers for your e-mail client.

    Email Server names:


    skynet

    linxure

    mtw300

    vircom

    Incoming POP3: mail.skynetbb.com
    Outgoing SMTP: mail.skynetbb.com
    Incoming POP3: mail.linxure.net
    OutgoingSMTP: mail.linxure.net
    Incoming POP3: mail.mytangledweb.com
    OutgoingSMTP: mail.mytangledweb.com
    Incoming POP3: mail.vircom.net
    OutgoingSMTP: mail.vircom.net


Hear What Our Clients Are Saying

We are trusted by more than 1,000 satisfied customers!

  • Rene Popke

    I love working with Skynet. Hands down, Skynet provides the complete package when it comes to internet and phone service. Skynet has developed a one-stop-shop that includes amazing customer service, internet, phone and tv. As a consumer, I have learned over the years, you get what you pay for and I highly value customer service and follow-through. Skynet has a team of employees that is professional, reliable, knowledgeable and takes their time to be sure the customer’s needs are met. I have been a Skynet customer at home since 2003 and switched my employer to Skynet when I started three years ago. Whether it is home or business, and regardless the circumstance, Skynet provides exceptional service at all levels and has reliable deliverables.

    Rene Popke

  • Mayor Liz Reynolds

    SkyNet Broadband is a company that is focused on top quality, expedient responsive customer service and a company that invests into their hometown community... My family has been and will continue to be with SkyNet Broadband for many ,many years... because of their high level of integrity and hometown commitment .

    Mayor Liz Reynolds - Enumclaw Mayor

  • Keith Fugate

    Fugate Ford\Mazda has been using Skynet Broadband and Biz IT Pros for several years now internet service is fast and support staff is great we are very happy with their service.

    Keith Fugate - Owner

  • Edward Hechter

    “Skynet (aka xPertPC+ / aka BizITPros) has been providing us with network consulting, I.T. infrastructure services, and PC repair services since 2008. During this time they have handled the build-out of our new building, a migration to VOIP, the set-up of a hardened, high reliability data center, and helped us manage our growing business. We consider them a vitally important, and trusted business partner, who always makes us feel like our business is important.”

    Edward Hechter - CEO Palama Place

    Contact Us

    Skynet Broadband
    1702 Cole Street
     Enumclaw, WA 98022
     United States


    info@skynetbb.com
    360-802-6657 
    1-888-GET-wDSL


    © 2015 Skynet Broadband. All Rights Reserved.

    Questions?

    Please let us know your name.
    Please let us know your email address.
    Invalid Input
    Invalid Input
    Please write a subject for your message.
    Please let us know your message.
    {Robot2:caption}
    {Robot2:body}
    {Robot2:validation}
    {Robot2:description}